Gayle Made a Baby Quilt Using 24 Equal Squares
I've been on a kick with baby quilts lately. I've put together a gratuitous baby quilt design that'southward doable for beginners and intermediate quilters, too!
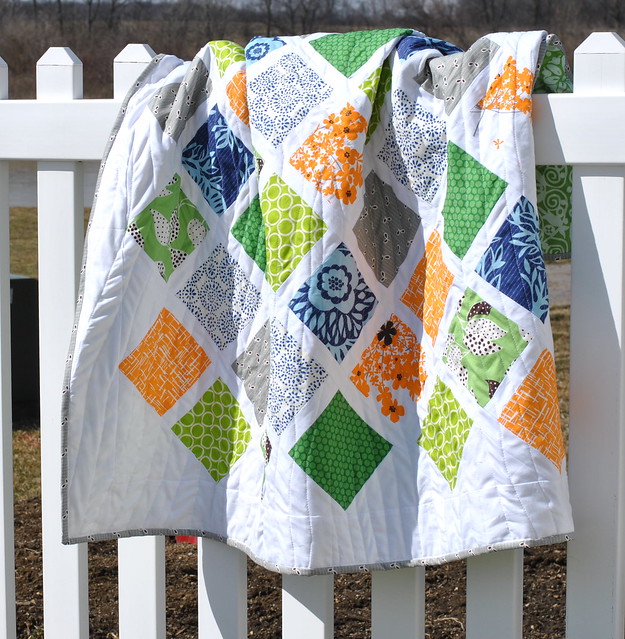
This babe quilt tutorial uses charm squares (5″ x 5″ precut squares, which yous tin can also cut from other textile in your stash) and well-baked, white sashing, for an effect that looks like a lattice fence; with pops of bright color popping through! Bright, monochromatic (all one color) prints look great with this quilt design, and the white lattice brightens upward any colors you choose. I chose "jungle colors" with a pop of brightness to match a baby male child's nursery, but you tin customize this design and colors to fit the size and look of your preferred quilt.
Let's answer a few questions earlier getting into the stride-past-step tutorial.

How large is a baby quilt?
The best size for a babe quilt is forty by 48 inches. Smaller sizes volition not provide much warmth and will probable end up as ornament instead of keeping the child warm . A larger size will allow the quilt to be used as part of a bedding ensemble, providing decorative and functional value.
The size you make up one's mind to go for will also touch on your conclusion almost what kind of fabric and patterns to use. If you desire the baby'south quilt to serve as a functional item rather than just ornamentation, I think it makes sense that you would desire information technology to be at least 36 by 40 inches, and probably larger. I can imagine that there tin be a lot of variation regarding the patterns yous might desire to use for such a quilt. Still, if you want your babe'southward bedding ensemble to be functional too as decorative, I call back picking smaller sizes would limit how much y'all could exercise with information technology.

Finished Quilt Size: Approx. twoscore″ x 48″
What size squares should I use for a baby quilt?
There are no ready rules about how big or minor these should be, then information technology simply comes down to personal preference. A very tightly pieced-looking blanket might have ane inch finished squares while a more open-looking blanket might have 2″ finished squares. For a babe quilt, there are many options when it comes to the size of the squares. The almost common sizes used in baby quilts are 3″, vi″, and 9″. I chose to apply 5″ squares in my step-by-step tutorial equally information technology seems like a happy middle, and it fitted well with how I conceived the finished production!
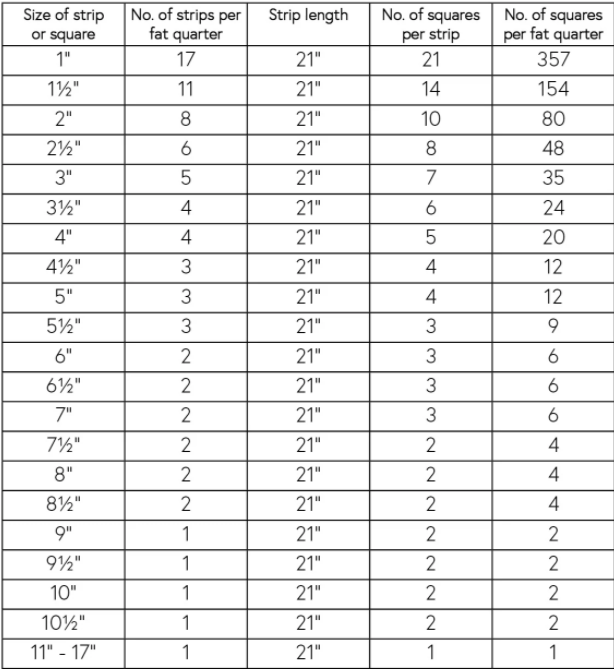
How many fat quarters do I need to brand a baby quilt?
Fat quarters are helpful for projects involving large quantities of patchwork because they tin can exist easily sold past size rather than yards or meters. Fatty quarters are a standard unit of textile used in the quilting community. One fat quarter equals xx-five square inches of fabric, which will yield nigh ix patches if cut into 4 pieces. See below a helpful chart allowing you to find out rapidly how many fat quarters you lot'll need based on the angling production size y'all go for.
How to make a baby quilt stride by step
What do y'all demand to brand a baby quilt:
– twoscore fabric squares 5″ x five″ (5 each of 8 assorted prints)
– 1 1/2 yards of white fabric for sashing, corner and side triangles, and border
– three/viii grand of binding fabric
– 1 i/2 yards backing fabric
– 44″ x 52″ batting

Cutting Instructions (Updated Jan 2022):
- Cutting 10 strips 1 ane/ii″ x WOF (width of fabric/selvage to selvage) for sashing (the lattice).
- Cut i strip 8 3/4″ 10 WOF. Subcut into:
- 1 white square 8 3/4″, and cut in half ONCE diagonally to make 2 half-square triangles.
- four white squares 7 i/2″, and cut each in half TWICE diagonally to make 16 quarter-square triangles.
- Cut 4 strips 3 1/two″ x WOF for borders.
- Cut five strips ii 1/two″ x WOF for binding.
All seams are 1/4″ and pressed open unless otherwise noted.
Best Quilting Sewing Machine for Beginners
Step 1 of eleven
Concatenation stitch your charm squares to the white sashing strips, sewing them onto the white strip one afterwards another. Don't worry nearly leaving much infinite between them, because you volition later cut them apart. Leave viii squares without a white stripe. Y'all should be able to sew 8 squares each onto iv strips, for a total of 32 squares with a border, and 8 squares without a edge strip.

Pace two of 11
Cutting apart the charm squares, trimming the white side borders equal to the sides of the square.
Step three of 11
Arrange your charm squares on point (like a diamond) in a colour arrangement that'south pleasing to you, with the white stripes resting between side by side blocks. Conform the squares without the stripes toward the ends of the rows, every bit pictured. If you used a design wall to adapt the blocks, yous could refer to a photograph for block orientation.
Step 4 of 11
Stitch together the rows as pictured to a higher place (rows are diagonal starting at the superlative left corner):
Row ane: 2 squares / 1 strip
Row 2: iv squares / iii strips
Row iii: 6 squares / 5 strips
*Row 4: viii squares / 7 strips
*Row 5: 8 squares / 7 strips
Row 6: half-dozen squares / 5 strips
Row seven: 4 squares / iii strips
Row 8: ii squares / one strip
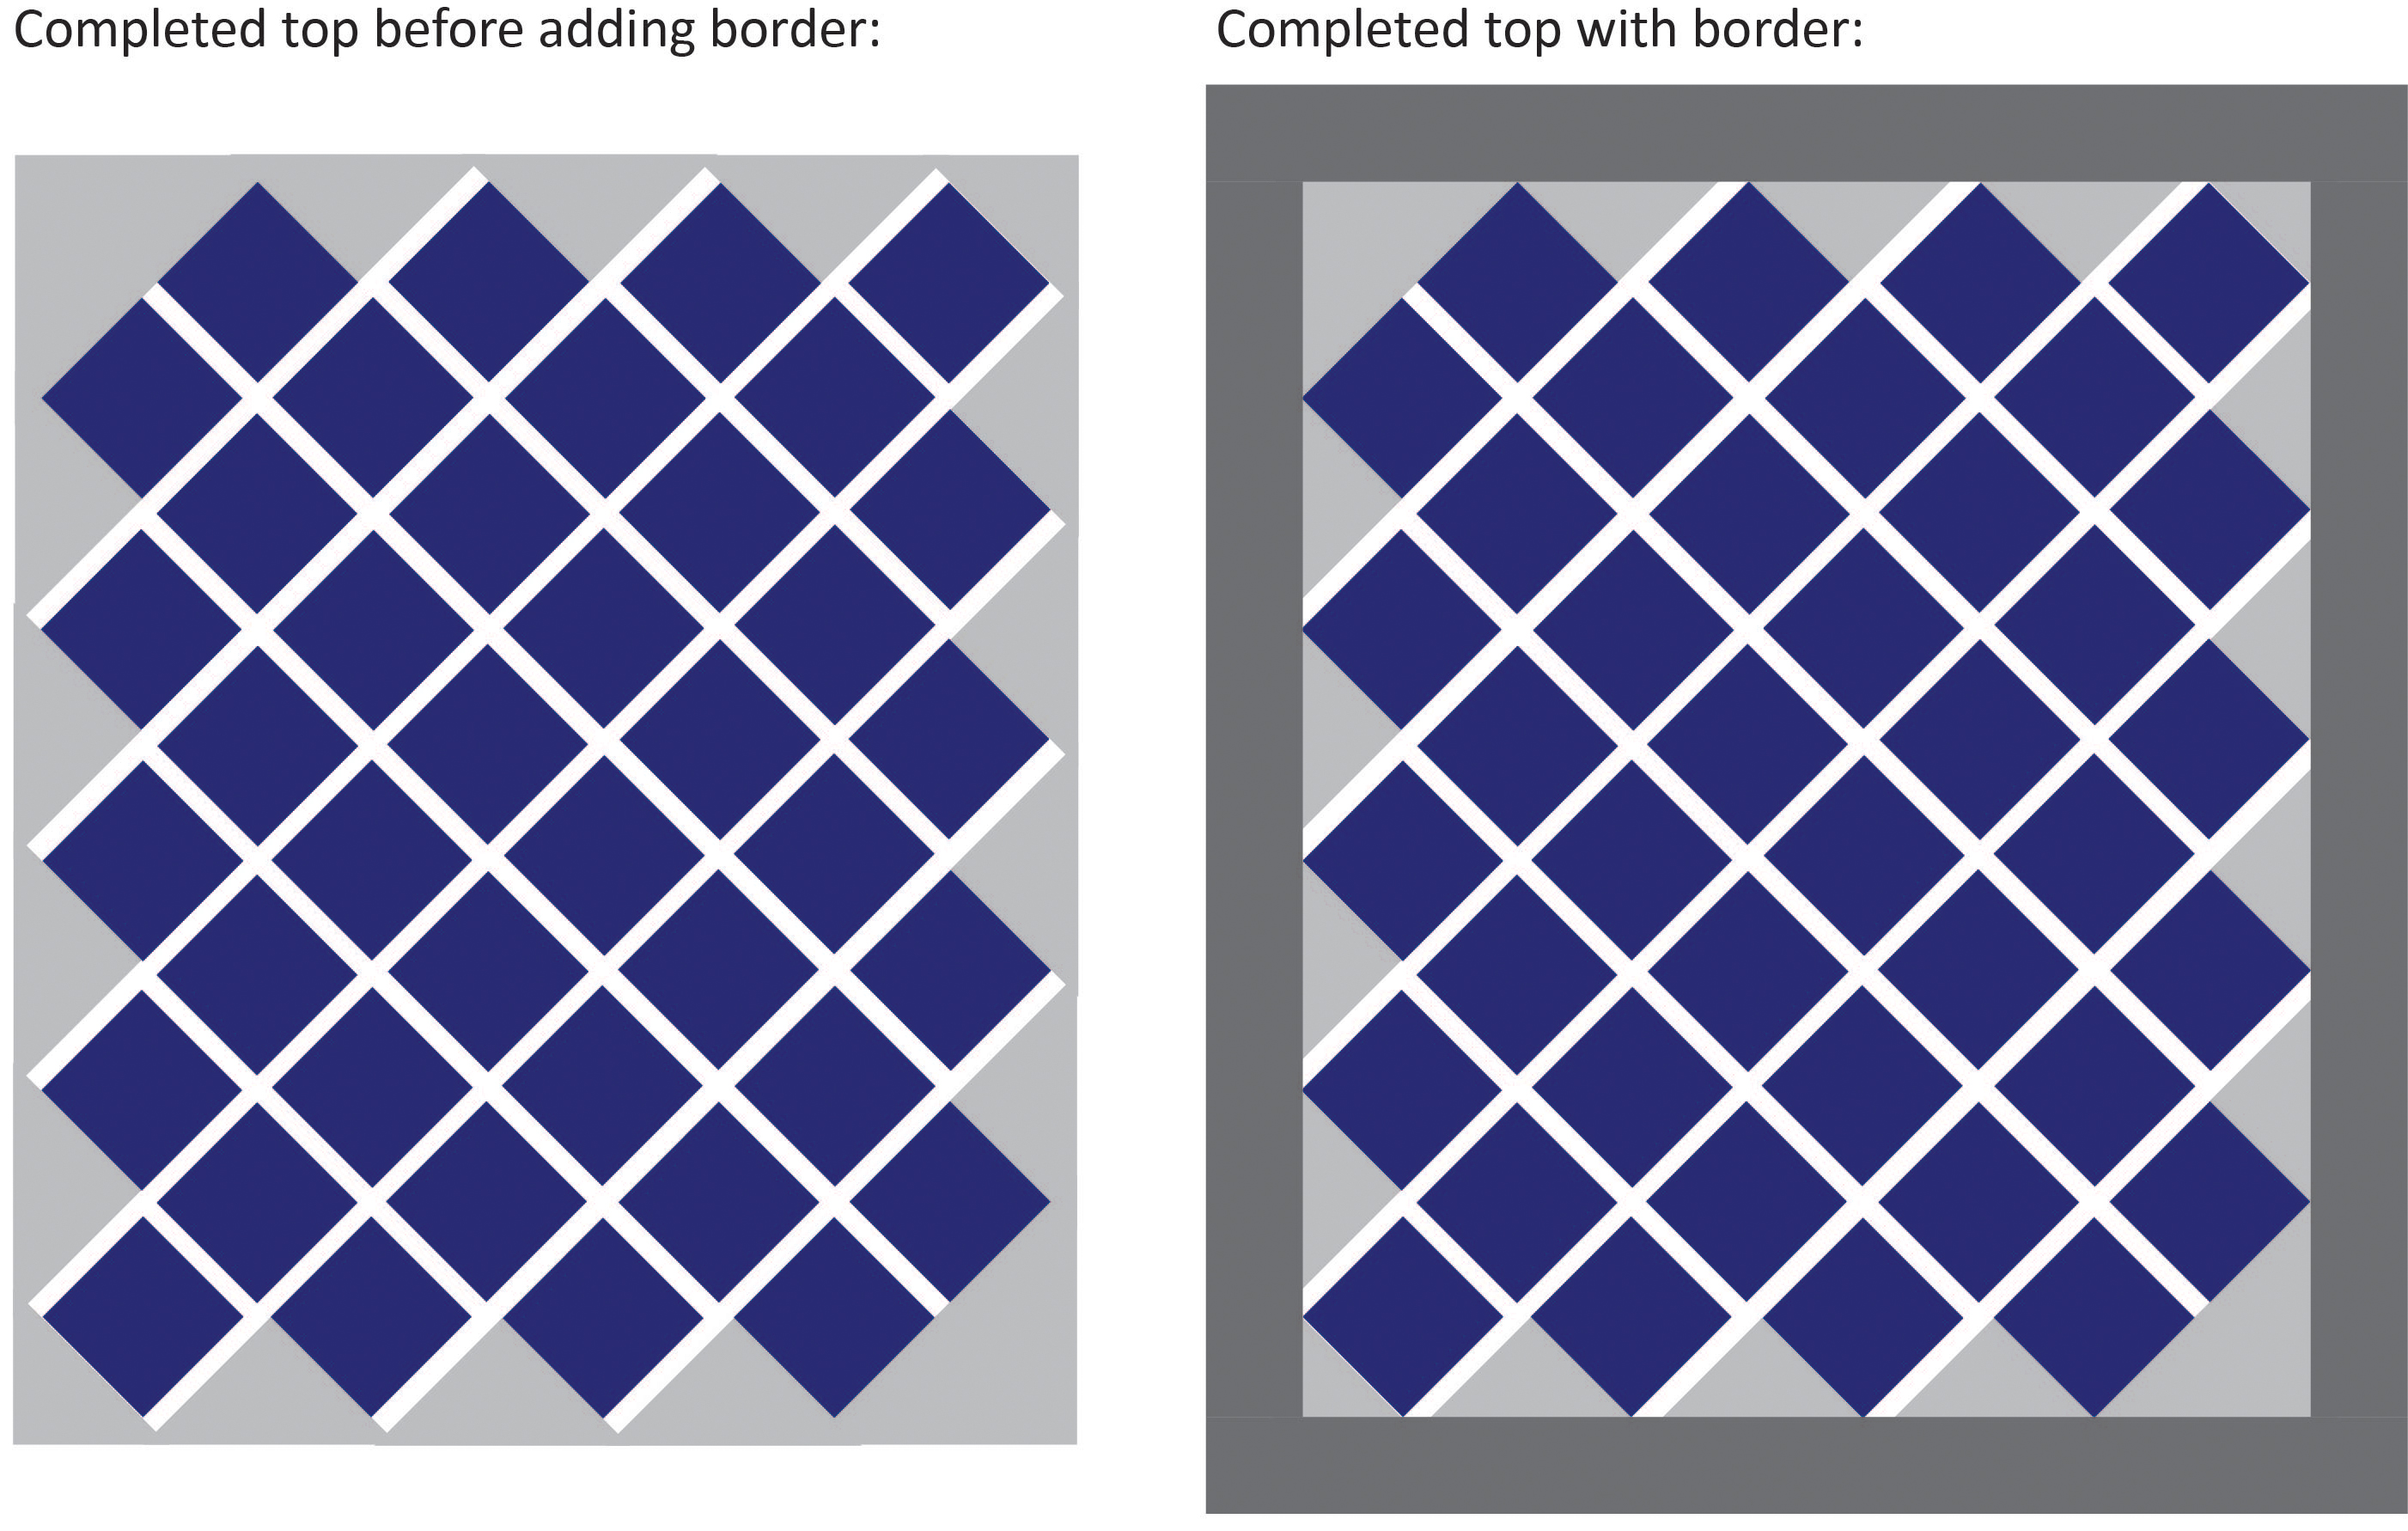
*Note: Pay close attention to the placement of diagonal Rows 4 & 5 (both 8 squares / 7 strips). If these are matched upward side past side, y'all'll become a square quilt. If you shift them like in the diagrams to a higher place in step 3, y'all'll become a rectangular quilt.
Step 5 of eleven
Arrange the white half-square triangles at the ends of each row, to make the quilt rectangular in shape. The long side of each triangle should face out toward the edge of the quilt tiptop. Stitch the triangles to the rows.

Step six of eleven
Place the larger triangles in opposite corners of the quilt, with the long side of the triangles facing the pairs of two squares. Stitch the triangles to the 2 wide corners.

Step vii of 11
Trim the sides of the corner triangles even with a ruler and rotary cutter. (Notation: With an 8 3/four″ square cut along the diagonal, you shouldn't have to trim as I did here. You'll have extra material in the corners! I used a vii ane/2″ square.)
Step 8 of 11
Layout your remaining sashing strips between each row, and stitch to between neighboring rows to bring together them. Sew the longer strips get-go. Trim the excess sashing strips and join them to other strips to go the length you need.
Step ix of 11
Continue adding sashing strips to the rows, pressing your seams as y'all go. I pressed the seams open up, which gave this quilt a well-baked, clean look with sharp angles.

Step 10 of eleven
Add a 3 1/2″ border to the left and right sides of your quilt. Trim off the excess. Add a 3 1/2″ border to the elevation and bottom of your quilt. Trim. Press the seams toward the border.
Step 11 of 11
Drip and quilt your baby quilt. Trim the borders even around the edges of the quilt, measuring 3″ from the seam. Sew on binding.

I chose wide, wavy lines and a slight woodgrain blueprint for quilting this baby quilt. I would accept added an extra layer of quilting between the wavy lines to go far tighter and more than textured, only I ran out of white thread and was on a deadline. I am excited that this quilt gets to stay in the family! It's fun to sew for people you know, isn't it?

I hope you enjoyed this free babe quilt pattern and photo tutorial. If y'all make this or any projects from Craft Buds, please share them on Facebook or Pinterest and don't forget to add together your comments/questions.
troyerhoublive1955.blogspot.com
Source: https://craftbuds.com/jungle-lattice-free-baby-quilt-pattern/
0 Response to "Gayle Made a Baby Quilt Using 24 Equal Squares"
Postar um comentário